|
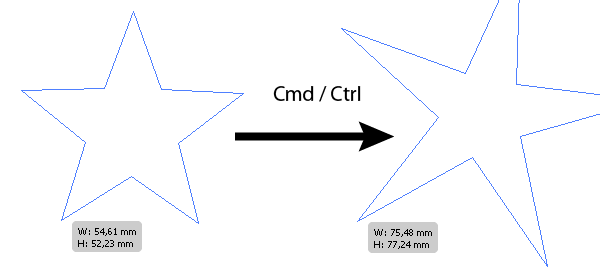
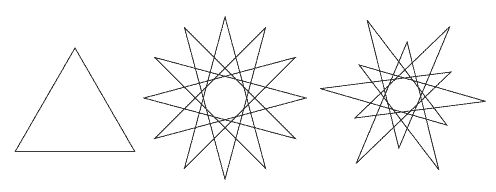
Natalie Ulrich shares some very interesting tricks with us. Today we learn some peculiarities of Star Tool and Blend Tool (W) application. Learn at the jump! Star Shape ChangingYou can change star shape in the course of its creation; to do so, press and hold the Cmd / Ctrl key. Each subsequent star shall have the same external to internal radius ratio. In order to modify such ratio, click with Star Tool in document field and enter the new values of radii to opened dialog box. Creation of Irregular Combined StarsSome times there is a need for prompt creation of star having irregular shape consisting of crossing paths. Let us see how to create such forms in a few seconds. Select Star Tool and in the time of star creation press several times the button with down arrow in order to get the star having three rays. Now, press shortcuts Cmd / Ctrl + Opt / Alt and then, press the button with up arrow in order to obtain combined multiprong star (each subsequent pressing the button with up arrow shall change star shape). You can make an experiment more complicated — hold the button Cmd / Ctrl in order to change radii ratio of the star being created.
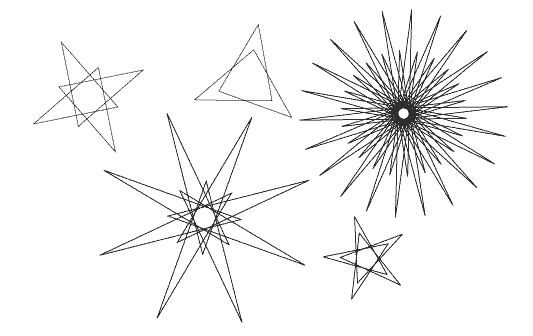
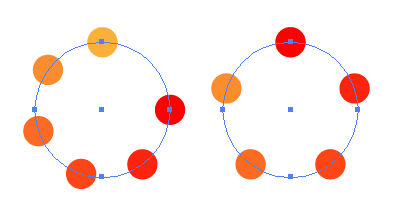
Now, Star Tool is able to create irregular stars similar to shown in figure below. In order to shift back to the normal mode of stars creation, press shortcuts Cmd / Ctrl + Opt / Alt in the course of the new star creation. Creation of Perfectly Shaped StarIn the time of star creation, its shape sometimes can be treated as not meeting your requirements. It is because Star Tool "remembers" last applied setting. In order to obtain the perfectly shaped star without changing any tool parameters, hold the button Opt / Alt in the course of its creation. In order to align the star relative to normals, hold the Shift button. Creation of SpirographUsing the variety of the form creation tools, such as Rectangle Tool (M), Ellipse Tool (L), etc. you can obtain the combined shapes, provided the button ~ is held in the course of the object creation. Please, be informed that upon the process of combined shapes creation is completed it shall be necessary to release firstly the mouse button and then, the button ~, otherwise you shall obtain the simple object instead of the combined shape. Leave Calculations to SoftwareBlend Tool (W) can make some calculations like calculator. For example, you have created two lines at some distance from each other, and you strive for even distribution of further three similar lines between them. Instead of calculation of the distance between the lines, create Blend between two initial objects. Select Blend Tool (W) and click on one line preventing selection of anchor points. Then, by holding the button Opt /Alt, click on the second line. Now, select an option Specified Steps in opened dialog box, and set required number of the new lines. Adobe Illustrator shall make all calculations and evenly distribute the new lines between the two initial ones. This effect is considered to be dynamic; the distance between lines shall be automatically changed should any of initial line be moved or angle between them be changed. Additional Transition in Blend ObjectIf you have created the transition between two objects and want to supplement it, you can make a copy of initial or final object. Using Direct Selection Tool (A) and holding the button Opt / Alt, drag one of the objects. Immediately upon the mouse button is released, the transition shall be supplemented due to the new object.  There is also another way of transition supplement by the aid of the new object. Create the object to be used as supplement for transition. Find the Blend and open its sublayers in Layers panel. Now, drag the new object having placed it between sublayers of Blend object. The form of supplemented transition shall be defined by arrangement of the new object in Layers panel. Should it be placed above sublayers of the initial objects of Blend object, we shall obtain supplementary transition between the new object and upper object of initial transition (figure 2). If the new object is placed between sublayers of initial objects, there shall be created two transitions — between bottom initial object and the new object, and between the new object and upper initial object (figure 3). If the new object is placed below transition sublayers, the supplementary transition shall be created between the new object and bottom object of initial transition (figure 4). Blend Object BendingIn order to change the transition path, it shall be necessary to create path to be followed by the transition. Select Blend object and path, then go to Object > Bend > Replace Spine. Distribution of Objects along CircumferenceShould the circumference be used as path for transition, the objects can be unevenly distributed along such circumference. There is a smart ruse enabling to eliminate such fault. Simply cut the circumference in one spot by the aid of Scissors Tool. Transition objects shall be automatically evenly distributed along the path. Blend Object Parameters Changing.In order to change parameters of the existing Blend object, go to Object > Blend > Blend Options or double click on Blend Tool (W) icon on the toolbar. Set the new parameters in opened dialog box, and Blend object shall be automatically updated. Also you can change the number of Blend object steps by the aid of the button with up arrow (to increase) and the button with down arrow (to decrease).
Effective Methods of Working in Adobe Illustrator (Part 1)
Effective Methods of Working in Adobe Illustrator (Part 2)
Effective Methods of Working in Adobe Illustrator (Part 3)
Effective Methods of Working in Adobe Illustrator (Part 4)
Effective Methods of Working in Adobe Illustrator (Part 5)
Effective Methods of Working in Adobe Illustrator (Part 7)
Effective Methods of Working in Adobe Illustrator (Part 8)
Natalia is a successful illustrator and photographer who works with micro stock sites. If you want to become financially independent and get a good source of passive income, register on micro stocks at the following links and start making money right now.
Shutterstock.com
Dreamstime.com
Fotolia.com
123RF.com
DepositPhotos.com
Lori.ru
Istockphoto.com
Follow us if you want to be the first to know about the latest Adobe Illustrator tutorials and articles. Vectorboom team works for you!
|