|
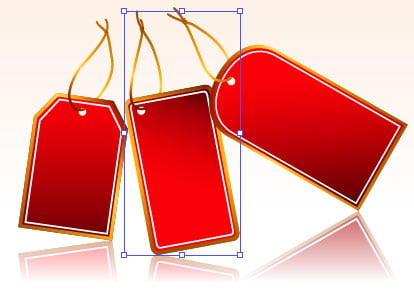
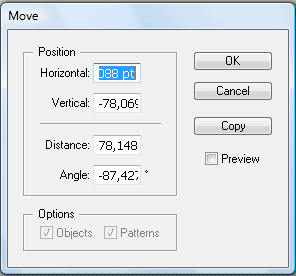
Today Natalie Ulrich will share with us some very interesting tricks. Personally, I found a lot of new and useful information in her articles. This and subsequent articles will include effective techniques that are used by professionals in their daily work, and with what you can save a lot of working time. Tips will be useful for beginners as well as for those who have been using Adobe Illustrator a while. If it takes you a while to do something, then you are doing it wrong.As you read these tips, go to Adobe Illustrator and do all the described steps there. So you will quickly understand and memorize them. Quick Access to the Selection Tool (V)When working with any tool, press and hold the Cmd / Ctrl key in order to temporarily activate the Selection Tool (V). You activate the last selection tool that was being used, so if you have previously worked with the Direct Selection Tool (A), thereafter this tool will be activated. To return to the currently selected tool release the Cmd / Ctrl. How to Hide the Bounding BoxWith the help of the Bounding Box, you can quickly change the size of the object, without using the Scale (S) tool, but it can be distracting when moving an object, especially if the object is small. It is very helpful to know how you can quickly hide and show the bounding box. To switch the visibility of the bounding box, press the keyboard shortcut Cmd / Ctrl + Shift + B. How to Hide Edges of PathVisible outlines of the selected object can interfere even more than the bounding box. Very often you may not see the object itself because of them. To enable / disable the visibility of the outlines use the keyboard shortcut Cmd / Ctrl + H. How to Hide the Document's MarginsBy default, Adobe Illustrator has the visibility of the document's margins on. If you need to remove them in order to evaluate the image without unnecessary restricting lines, you can press the keyboard shortcut Shift + Cmd / Ctrl + H. Quick Access to the Move Dialog WindowIf you need to open the Move dialog window, it is not necessary to look for it in the Object menu. You just need to double click on the Selection Tool (V) or Direct Selection Tool (A) icon on the toolbar. Positioning When Creating a ShapeUsing any tool for building the shapes can change the position of the created shape. To do this, press and hold the spacebar to "suspend" the work of the tool and move the shape. After releasing the spacebar, you can continue building the shape. Technique is especially useful for creating objects using ellipses, as you can easily get into the point from which you start building. Tool configurations
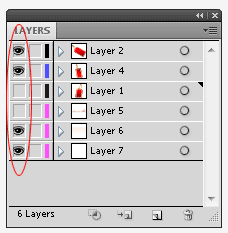
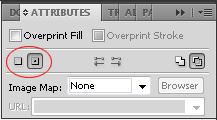
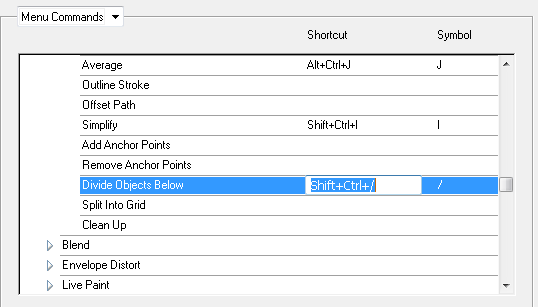
Most tools have their own settings the changes of which affect their work. To get a quick access to them is quite easy, just double-click on the toolbar icon. The following tools have the configurations: Line, Arc, Rectangular Grid, Polar Grid, Flare, Paintbrush, Pencil, Blob brush, Smooth, Eyedropper, Blend, Live Paint Bucket, Live Paint Selection, all of the distortion tools, the tools for working with symbols and graphs. Note that the Blend Options dialog window can be opened by double clicking on the icon on the toolbar, without looking for it every time in the Object menu. How to Quickly Hide and Show the Multiple LayersIf your image consists of a large amount of layers or underlayers, and you want to hide some of them, click the eye icon in the Layers palette and drag the cursor on the rest of the icons. This way you show or hide several adjacent layers. And if you want to see just one layer, and hide the rest, just hold the Opt/ Alt key and click on the icon of the eye of the layer that you would want to see. To show the view of other layers, click on the icon holding down Opt / Alt. Keyboard Shortcuts for ZoomingTo display images in real size, use the keyboard shortcut Cmd / Ctrl + 1, and to fit artboard in window use Cmd/ Ctrl + 0. These modes can be switched by using the toolbar. For the Actual Size Mode (100%) double-click on the Zoom tool, and to set the Fit Artboard in Window double-click on the Hand tool. Changing the Position of the Zoom AreaIf when creating a frame for zooming area with the help of the Zoom Tool (Z), you placed the cursor at the wrong place, do not rush to release the mouse button. Holding the spacebar, change the position of the frame, and then release the space button to continue increasing the area. Shortcuts for the Zoom Tool (Z)In order not to go to the toolbar each time to activate the Zoom Tool (Z), press the key combination Cmd / Ctrl + Space. This will temporarily activate the tool. Click with a mouse to zoom in, and release the button to return to the selected instrument. To zoom out, use the keyboard shortcut Ctrl / Ctrl + Opt / Alt + Space. Shortcuts for the Hand Tool (H)You can forget about choosing the Hand Tool (H) on the toolbar. To temporally activate it, just press the spacebar, and then release the button to return to the current tool. Displaying Central PointCenter point is always visible in rectangles and ellipse, but it not in such objects as polygon or star. You can enable or disable the display of the central point in the Attributes panel. Select the object, click in this pane on the small icon of Show Center and Don't Show Center. This procedure should be done for each object. Displaying PanelsTo free the workspace, you can temporarily hide all the panels by pressing Tab. The toolbar will disappear at the same time. To keep it and hide all the panels, press Shift + Tab. Quick Change of ToolsTo pick a tool from the group, press and hold the mouse button on the visible tool, that opens a submenu with all the tools of the group. You can also hold the Opt/ Alt button to change the tool at the time of clicking on the visible tool. Each click activates the next tool. Assigning Hot KeysWhen creating a vector illustration you often use commands that do not have shortcuts, for example, the Expand, Expand Appearance, Divide Objects Below, Simplify, etc. It is very uncomfortable to find them each time in the program menu. It is better to assign their own shortcuts for them once and enjoy it. Go to Edit > Keyboard Shortcuts, open the Menu Commands tab and choosing the right command, pick the shortcuts for them that haven't been assigned yet in the program. You can always go back to default shortcuts, selecting the Illustrator Defaults in the Set field. I hope the received tips will be useful in your everyday work.
Natalia is a successful illustrator and photographer who works with micro stock sites.
If you want to become financially independent and get a good source of passive income, register on micro stocks at the following links and start making money right now.
Effective Methods of Working in Adobe Illustrator (Part 2)
Effective Methods of Working in Adobe Illustrator (Part 3)
Effective Methods of Working in Adobe Illustrator (Part 4)
Effective Methods of Working in Adobe Illustrator (Part 5)
Effective Methods of Working in Adobe Illustrator (Part 6)
Effective Methods of Working in Adobe Illustrator (Part 7)
Effective Methods of Working in Adobe Illustrator (Part 8)
Shutterstock.com
Dreamstime.com
Fotolia.com
123RF.com
DepositPhotos.com
Lori.ru
Istockphoto.com
Follow us if you want to be the first to know about the latest Adobe Illustrator tutorials and articles. Vectorboom team works for you!
|