|
Natalie Ulrich will share some very interesting tricks with us. Today we will talk about work with guides. After finishing today’s tutorial we will know how to create guides, how to hide and snap an object to them and how to create the prospective grid and so on. Learn at the jump!
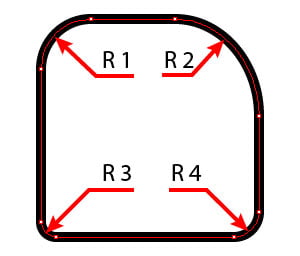
The guides are very important for those, who need accuracy in their illustrations, for example in creation of logos or difficult technical models. Perhaps, the most important thing one should know about the work with guides, is that a snap is determined by the position of the cursor, and not by the edges of the dragged object. For example, you have a guide and a rectangle; you need the side of the rectangle to match strictly with a guide (refer to the figure to the left). To begin with, we need to turn the snap to the points on. To do so, go to the View > Snap to Point or press the Opt / Alt + Cmd / Ctrl + " keys. If you drag the rectangle from any dot (refer to the central picture), then you won’t be able to snap the side of the rectangle any more. You need to place the cursor exactly on the object’s border and then drag it to the guide. When the cursor is on the 2px distance from the guide, it will be fastened. The cursor changes its color from white to black.  If you cannot place the cursor on the edge of the rectangle and drag it because the Bounding Box will be on your way, you can turn it off by pressing the Cmd / Ctrl + Shift + B shortcuts. Here are some more shortcuts that can be used in the work with guides: - Show / Hide Guides — Cmd / Ctrl + ;
- Unlock / Lock Guides — Cmd / Ctrl + Opt / Alt + ;
Creation of Guides from ObjectsIf you are not satisfied with only horizontal or vertical guides, create your own guides. Select any object which can be used as a guide, go to the View > Guides > Make Guides and use the Cmd / Ctrl + 5 shortcuts. To transform the guides back to objects unlock them first (Cmd / Ctrl + Opt / Alt + ;) and then go to the View > Guides > Release Guides (Cmd / Ctrl + Opt / Al t + 5).
How to Snap a Guide to an ObjectSometimes you have such a situation, when you need to range a guide to already existent object. To do so, turn the Smart Guides (Cmd / Ctrl + U) mode on and you will do this operation without any effort. Creation of Perspectives with GuidesSo we already know how to transform objects into guides. Let’s use guides as a perspective net. Make straight lines which correspond to the perspective grid of the future objects. When you get the perspective grid, transform those lines into guides (View > Guides > Make Guides or Cmd / Ctrl + 5). Now you can be sure that the objects will be drawn in accordance with the perspective descent. You can also turn the Smart Guide mode (Cmd / Ctrl + U) on to range exactly the contours to the perspective grid. How to Hide GuidesTo hide or show guides, you can use, as it was already said earlier, the Cmd / Ctrl + ; shortcuts. If you want to have more flexible control for your guides, then place them into a separate layer. Now you can hide all the guides by pressing the eye icon with guides in the Layers panel. Moreover, couple of layers with different guides can be created to make better control over them. Quick Lock of a Selected ObjectAn object can be locked in the Layers panel by turning the lock icon in front of it. But you can do it even faster. Simply select the object and press the Cmd / Ctrl + 2 shortcuts. To unlock all the objects, press the Cmd / Ctrl + Opt / Alt + 2 shortcuts. How to Quickly Hide an ObjectIf an object is selected press the Cmd / Ctrl + 3 to hide it. To show all the objects again, press the Cmd / Ctr l+ Opt / Alt + 3 shortcuts. A View of PointerCaps lock changes pointer to cross hair for selected tools
Effective Methods of Working in Adobe Illustrator (Part 1)
Effective Methods of Working in Adobe Illustrator (Part 2)
Effective Methods of Working in Adobe Illustrator (Part 3)
Effective Methods of Working in Adobe Illustrator (Part 4)
Effective Methods of Working in Adobe Illustrator (Part 6)
Effective Methods of Working in Adobe Illustrator (Part 7)
Effective Methods of Working in Adobe Illustrator (Part 8)
Natalia is a successful illustrator and photographer who works with micro stock sites. If you want to become financially independent and get a good source of passive income, register on micro stocks at the following links and start making money right now.
Shutterstock.com
Dreamstime.com
Fotolia.com
123RF.com
DepositPhotos.com
Lori.ru
Istockphoto.com
Follow us if you want to be the first to know about the latest Adobe Illustrator tutorials and articles. Vectorboom team works for you!
|