|
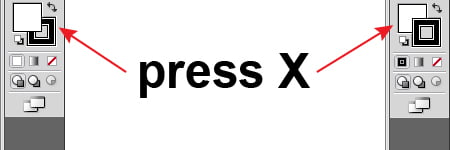
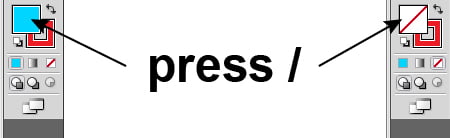
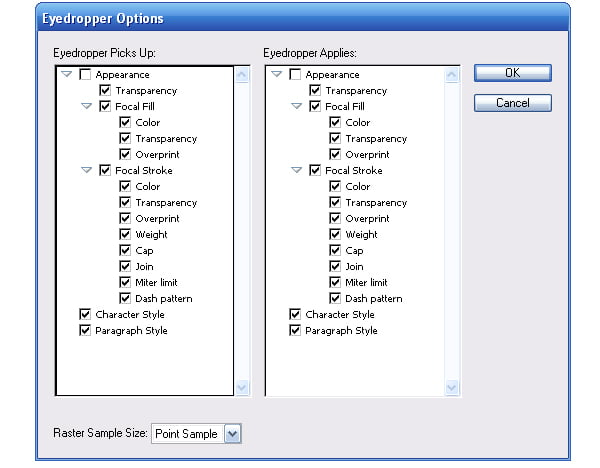
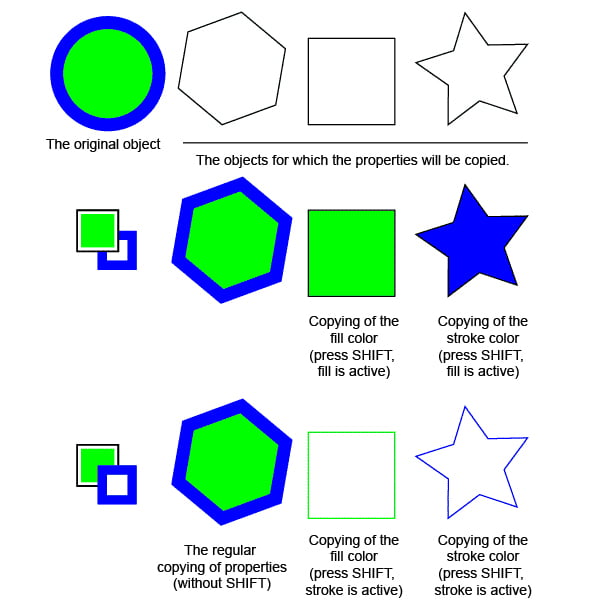
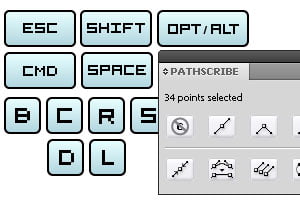
Today Natalie Ulrich will share some very interesting tricks with us. In this article we will talk about the work with color, gradient fills and about peculiarities of work with the Eyedropper Tool. Also we will learn a bit more about the alignment of the objects with the stroke. Personally I found a lot of new and useful information in this article. Learn more at the jump! Switching between Fill and StrokeBefore you choose your color you should specify whether you work with the fill or with the stroke of the selected object. The switch key is situated on the bottom of the toolbar. The active mode is indicated on the foreground. If you want to switch their places press shotcuts X. Every time when you press this button the activity of the fill and stroke is been switched. Quick Cancel of Fill or StrokeIf you want to give to a fill or to a stroke None value, press the / button. Swap of Fill and StrokeIf you want to swap the color of a fill and a stroke, press the shortcuts Shift + X. The Eyedropper Can Choose Only ColorThe Eyedropper Tool (I) copies the appearance of the object on default, and that is the color of the fill and stroke, the stroke characteristics and the transparence etc. These settings are set by double click on the button of this tool (look at the picture) But you also can copy only the color without choosing the options in the dialog box of the tool. To do so, hold the Shift button while choosing the color with the Eyedropper (I). Pay attention what element is active- the stroke or the fill, as the color is applied only to the active element. Thereby, you can easily copy the color for the fill from one object from the color of the stroke to the other object. Selective Transformation of Pattern
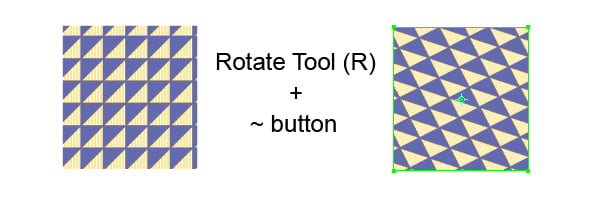
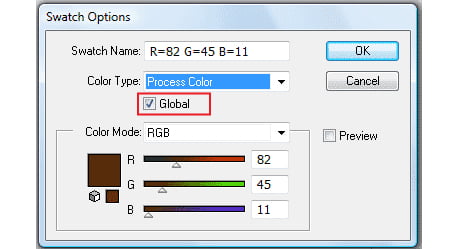
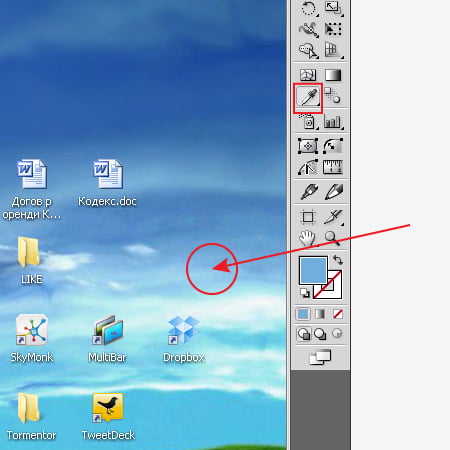
Not only objects can be transformed, but also a pattern. Moreover, the object can be untouched if you do so. When you use any transformation tools (Rotate Tool, Scale Tool, Shear Tool and so on) hold the ~ button (tilde) pressed. Do not release the button until the transformation is finished, otherwise the object itself will be transformed Usage of Global ColorGlobal color allows to create the document in which the colors of all objects can be easily changed. Create a new color swatch in the Swatches panel; double click on the color swatch and tick Global in the Swatch Options dialog window. Use this color swatch for all objects whose colors you would like to change. If you have such an opportunity, simply edict the Global color double clicking on its swatch. Or you can drag the other color swatch on the previous one in the Swatches panel while holding down the Option / Alt. On the picture below two Global colors were created, one for the background and the other one for objects. As the objects were not selected into group their color can be easily changed with the Globe color. Color from Any Place on Your ScreenYou can get the sample of the color at any spot of the screen, even if you get behind the Adobe Illustrator framework. Select the Eyedropper Tool and click it on any free spot. While holding it with the mouth button, drag the tool into any visible color even in any other application or simply on your desktop. While the cursor moves, the color changes automatically. You can choose any color you like, except only the color from the "Start” button in Windows Vista :). Application of Chosen ColorsAfter you chose the color with Eyedropper Tool (I), it can be applied to non-selected object if you hold the Option / Alt button. When you do so, the tip of the tool turns into black. Selection of Gradient ColorYou can also choose the color for gradient with the Eyedropper Tool (I). To do so, click on the color slide which color you want to change on the Gradient panel and choose the color with the Eyedropper Tool (I) holding the Shift button. Color Doubling of Gradient’s SliderIf you need to use the same color in different parts of gradient, you can copy the color slider. While holding the Option / Alt buttons, click on the color slider on the Gradient panel and then drag the cursor creating a new slider Substitute of Gradient’s Color SliderTo swap the color sliders on the Gradient panel, drag one slider into the other while holding the Option / Alt buttons. Usage of Color Swatches for GradientIf you select the color swatch on the Gradient panel, and then click on the color sample on the Swatches panel, the object will be filled with the selected color instead of the change of gradient. To apply the sample’s color to slider, select the necessary slider, press the Option / Alt button and click on the color swatch on the Swatches panel. You can also drag the color swatch from the Swatches panel to the Gradient panel to substitute or create a new slider. Quick Change of Stroke’s ColorThe stroke’s color can be easily and quickly change even if it is not selected. You need to drag the sample color from the Swatches panel or the Color panel to the stroke. If the stroke mode is not active on the toolbar, you need to hold down the Shift button while doing the dragging. Change of Color Models in Color PanelTo change the color model in the Color panel with the RGB or the HSB for example, click on the Color Spectrum Bar while holding down the Shift button. As a result, you can leaf through all the available color models. Two Ways to Get Grey ColorIf you need grey color, you can get it in two ways. You can use the Grayscale Color mode for that while changing the color saturation from while (0%) to black (100 %). Though, this object will always remain grey, and you wouldn’t be able to make it colorful until you change the color mode. Choose the CMYK color mode in the Color panel instead. Then enter the value into K field, in this case you can always make the object be colorful.
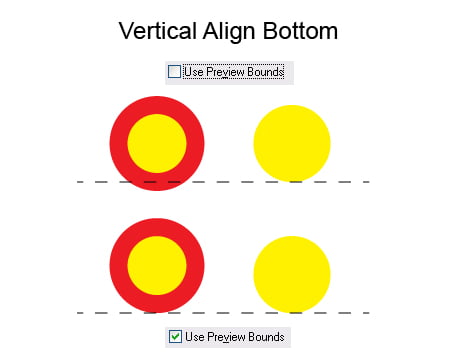
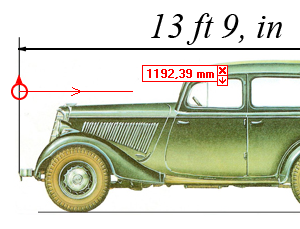
Use Preview BoundsWhile doing alignment or dimension, Adobe Illustrator takes into account outline of the object ignoring the width of the stroke by default. To take into account the width of the stroke, tick the Use Preview Bounds in the Preferences dialog box (Cmd / Ctrl + K). From now on all the changes and calculations will be made by taking into account the width of the stroke, as it is shown on the picture below. The only disadvantage of the tip is that the selected option influence all further actions and changes. But when you use the Align panel, you can use the Use Preview Bounds option in the fly-out menu of this panel. You can read the pervious parts here:
Effective Methods of Working in Adobe Illustrator (Part 1)
Effective Methods of Working in Adobe Illustrator (Part 2)
Effective Methods of Working in Adobe Illustrator (Part 4)
Effective Methods of Working in Adobe Illustrator (Part 5)
Effective Methods of Working in Adobe Illustrator (Part 6)
Effective Methods of Working in Adobe Illustrator (Part 7)
Effective Methods of Working in Adobe Illustrator (Part 8)
Natalia is a successful illustrator and photographer who works with micro stock sites. If you want to become financially independent and get a good source of passive income, register on micro stocks at the following links and start making money right now.
Shutterstock.com
Dreamstime.com
Fotolia.com
123RF.com
DepositPhotos.com
Lori.ru
Istockphoto.com
Follow us if you want to be the first to know about the latest Adobe Illustrator tutorials and articles. Vectorboom team works for you!
|