|
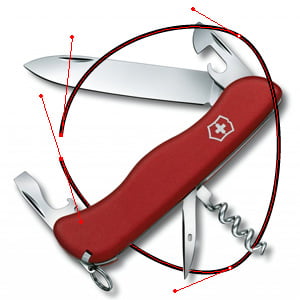
Final Image Preview
You can download the source vector file for this tutorial 
Doodle style is very popular now. Today we are going to master the technique of creating
speech bubbles in
such a style, using Adobe Illustrator, effects, Appearance palette and Graphic Style palette. Having studied this Adobe Illustrator Tutorial, you can create quite complex images conveying light and shadow.
Tutorial Details - Program: Adobe IllustratorCS-CS5;
- Difficulty: Beginner
- Estimated Completion Time: 10-15 minutes
A doodle is an unfocused drawing made while a person's attention is otherwise occupied. Doodles are simple drawings that can have concrete representational meaning or may just be abstract shapes. The common examples of doodling are produced during long telephone conversations if a pen and paper are available (Wikipedia).
Step 1Begin with creating the stroke of objects in the Doodle style. Create any object with a stroke and no fill, in my case it is a speech bubble, a graphic element that you can find in comics and cartoons. You can also read my other illustrator tutorial "How to Create a Glossy Vector Speech Bubble Icon".
Step 2Select the object and go to Effect > Transform & Distort > Transform and set the options listed in the image below.
Your parameters may differ from mine, of course. Always turn on preview option in the effect dialog box to monitor the changes of graphics in real. Besides, you can edit the settings if you do not get what you wanted, but we will talk about that later.
Step 3Because our style imitates free-hand drawing, roughen the lines a little bit. Keep the object selected, go to Effect> Transform & Distort> Roughen, and monitoring the graphics changes, set the effect parameters in its dialog box.
Step 4Increase the number of stroke lines, usually when drawing an object should be outlined a few times - Effect> Transform & Distort> Transform.
Step 5Now you can reset the effects. Select an object and open the Appearance palette. In this panel we can see all the applied effects and their sequence. You can access the parameters of the applied effect, by clicking on its name in the palette. I decided to add another Roughen effect. In addition to changing the effect parameters, you can change their sequence too.
Step 6Once you achieve the desired result, open the Graphic Styles palette and save the new style. Now you can apply this style to objects of any shape. Of course, you can edit the result through the Appearance palette.
Step 7To edit the objects manually, go to Object> Expand Appearance. This operation will lead to the creation of a group of objects with a stroke, which can be moved and / or their points can be edited.
Step 8To fill the object with gradient fill, go to Object> Expand. And fill all the objects, or one at a time (can be done in different directions) with bright gradient fill.
Step 9Now let's take a look how we can slur the objects in the Doodle style. Create a random object with a fill. Proceed to Effect> Stylize> Scribble and set the effect parameters. To understand what are the parameters responsible for, turn on the preview option and experiment, observing the results, it appeals boring for me to describe this.
Step 10In order to achieve more dense slurs often strokes, very often the strokes overlap each other in different directions. We can also create this effect. Open the Appearance palette and duplicate the fill. Fill is copied along with the effect applied to it. Now click on the new effect in the Appearance palette and change the angle of strokes. As is in the case of the Doodle stroke, you can save the result in the Graphic Styles palette and apply to other objects, saving valuable time. And of course, color the slurs in the colors of the rainbow. Using this technique, you can create a font in Doodle style.
Step 11Now let's look at the ways of creating light and shadow. Do you know how graphic artists reproduce light and shadow? The first method - create a common background, and cross-hatch the shade with a great touch, or any other direction of the stroke.
Step 12
The second way - change the pressure on the pencil (change the line thickness) while hatching. At this way step we will go into details. Create a horizontal shading, as described above. Keep the object selected, go to Object> Expand Appearance. Now create the shape of the brush. Take the Ellipse Tool (L) and create a circle the diameter of which is equal to the maximum thickness of the line. In my case it is 3px. Stretch out the right point on the circle to the right, using the Direct Selection Tool (A) and hold down the Shift. Convert this point from a smooth to a corner.
Step 13Drag the shape you created in the Brushes palette and save it as an Art Brush. Users of Adobe Illustrator CS 5 would recommend select Stretch Between Guides, this will give you more flexibility in adjusting the distribution of the thickness of the brush along the path. Now select the contour of the hatch and use a brush. Now managing the guides, you can change the intensity of light and shadow, as in a linear gradient.
Step 14Somebody who is familiar with the graphics, not by hearsay, of course, says, "xross Hfching cannot be done as a zigzag line" and will be certainly right. Well, first of all, we are dealing with a stylized drawing, and secondly, you can shade wider than the object, then turns hiding the lines with the Clipping Mask for the contour of the object. The resulting icon below was obtained using the described techniques. You can also download Free Vector Greeting labels. Final Image
You can download the source vector file for this tutorial
Follow us if you want to be the first to know about the latest Adobe Illustrator tutorials and articles. Vectorboom team works for you!
|