|
Designers who use auto-tracing of bitmap images while creating often end up with very large vector files. This problem can lead to a significant slowdown in the workflow. Large vector files are not accepted to micro stock websites, it is harder to email such files to your colleagues or customers, and finally they take up a lot of space on your computer.
In today's article, you'll learn how to significantly reduce the file size with the use of VectorFirstAid.
What is the problem?
The size of the files received from the auto-tracing directly depends on the amount of anchor points. The higher the quality of the vector you wish to achieve, the more anchor points you will have. You can try to reduce them with the help of the native simplify feature (Object > Path > Simplify), but it can greatly reduce the image quality.
Example
Let’s take a look at this problem using the example of the tracing of this strawberry watercolor. This painting was created specifically for this article by my friend Timmy Turner.
Now convert the scanned image into a vector with the help of the Image Trace feature. To achieve the highest quality, choose a High Fidelity Photo preset and 100% for the Colors option in the Image Trace panel.
As you can see here, we get 43264 paths and 286858 points. Now click on the Expand button in the Control Panel and save the file, then verify its size (24,8Mb).
Solution
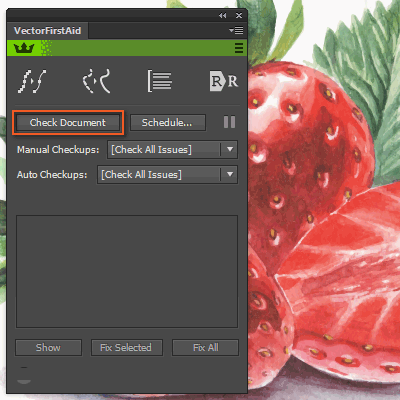
Check the file using VectorFirstAid. Open its panel (Window > VectorFirstAid > VectorFirstAid panel) and then click on the Check Document button.
You can read full version of this article on AstuteGraphics.com....
|