|
Since Illustrator 10, Adobe’s most used vector program has had a variable data feature, allowing users to create a set of documents by using a data file with variable text, images, object visibility states, and graphs (not supported or covered by VariableImporter.jsx at the current time 05/2015, but expected to be supported in the future). The problem was that unlike InDesign, which natively imports .CSV and .TXT files with its Data- Merge feature, Illustrator only accepted XML files.
Illustrator XML files are much less forgiving than the above-mentioned text formats. They have to follow XML syntax rules, which means, among other things, converting some characters into XML entities such as: "&" ampersand has to become "&"
Thanks to Adobe’s scripting functionality, a script called VariableImporter.jsx now overcomes this issue, allowing you to create a robust set of variable-data documents, faster than possible with other means.
This tutorial will show you how to quickly create a dynamic business card document which uses dynamic text, linked-file and visibility variables to change the appearance of the content on the page. This is a brief description of the variable types we shall be dealing with:
1) Text: text is simply the text characters to replace text inside of a text frame in an Illustrator document. The text frame can be any Illustrator text variety; point-text, area-text, type-on-a-path. Text can be too large for a containing text area box or type-path, and will cause text-overset.
2) Linked Files: linked files are Illustrator link art objects, which are simply placed images inside an Illustrator document. You can tell an image is linked because it will have diagonal guidelines appear when selected. The linked-file variable will replace the image within this graphic frame. The way a different-sized image replaces the placeholder image in terms of dimension and scaling, is controlled in the linked-files panel’s fly-out menu’s Placement Options.
3) Visibility: visibility variables control whether an art object is visible or not by toggling the object’s visibility status in the Layers panel. This is the same as clicking on the eye-ball to hide an object. In Illustrator, this can be a powerful tool because some appearances can vary greatly based on the visibility of art objects, and they are especially easy to use with this script as you shall see soon.
Populating spreadsheet - Correctly naming the column header:
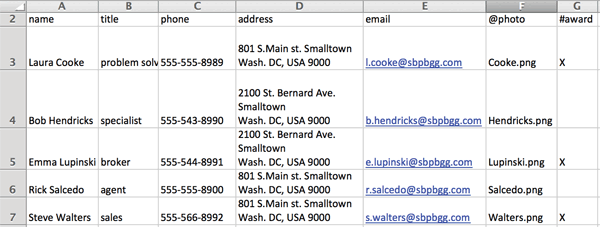
To start a variable-data project in Illustrator, first make a data-sheet with the kinds of information you’d like to display. This is accomplished by using Microsoft Excel or any text editor which has functionality of rows and columns, to create a text file with the necessary information.
 For the business cards in this tutorial, we will use Microsoft Excel to create the data file with the following fields: 1) Name, 2) Title, 3) Email, 4) Phone Number, 5) Photo, 6) Address, 7) Award. To make the file, start a new spreadsheet document in Excel, and type in the names of your fields into the top row of the spreadsheet. For best results, refrain from using spaces or any kind of special character in these “names”, or starting a name with a number as the first character, because if they do not conform to the XML naming convention, the script will overwrite them as a generic “Variable1”, “Variable2”, etc. This does not apply when characters @ or # are used as the first character, because they designate a column of data as linked-file or visibility variable types, respectively. For the Photo field, use the @ character in front of the title, to get “@Photo”. For the Award field, use the # character in front of its title, to get “#Award”. Besides the special characters “@” and “#” which are used to designate a special variable type, the column titles should adhere to the XML naming syntax, which boils down to: do not use special characters other than letters or numbers and use no spaces (do not start with a number). In case you do input an XML-unfriendly column title, the script will not fail, it will simply exchange the faulty column title with a generic name such as “Variable1”.
Populating spreadsheet with Text Variables:
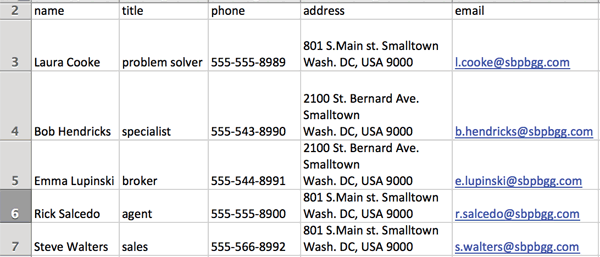
To populate the spreadsheet with your data, type or paste in the text you’d like to appear in each column, for all the text-containing fields. In my example, I use an entire address with an included carriage return. To put a carriage return using Excel, you have to press Alt and Return a the same time, while editing the text contents of a cell. Illustrator does not have the ability to assign more than one text variable within a text-frame, like InDesign, but VariableImporter helps out by parsing carriage returns.
Populating spreadsheet with Linked-File Variables:
For the image fields (Photo), you only need to type in the name of the image file to be used in each record of this field, provided all of the images will be in the same folder. It is possible to type in the entire file path with correct syntax used in your platform, so files can be found in any location you specify, but for this tutorial we’ll just use a common folder.
Populating spreadsheet with Visibility Variables:
For the visibility fields, there are two “modes” in which visibility information can be read: 1) write “true” or “false” into the cells, 2) write any character into cells you would like to be ‘true’ and leave completely empty those cells which you would like to be ‘false’. Visibility variables simply show and hide the associated art object in the layers panel, same as manually clicking the ‘eyeball’ inside the layers panel. The way VariableImporter processes this can be advantageous on those spreadsheets where writing “true” and “false” is inconvenient. For me, it’s always inconvenient, so I will use the 2nd method.
 After the spreadsheet is ready inside of Excel, it’s a good idea to save the ‘master’ workbook as a .xslx file and then to save another copy in .csv or (tab-delimited) .txt format. VariableImporter will import data from .txt and .csv files, but as an Excel warning may tell, those formats do not support some Excel features which you may want to use on your master workbook for future uses (such as cell styling).
Setting up the Illustrator Template:
The Illustrator document which will be used to produce the dynamicallygenerated documents will need to be constructed with attention to several details.
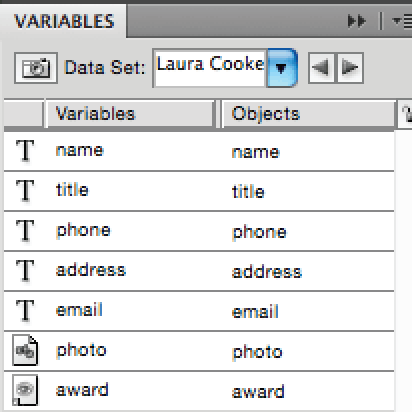
First, in case you are not familiar with variables inside Illustrator, the panel for this functionality is located in Window > Variables. In the panel, we are given the options to make new variables and manually assign them to art objects by having our art object selected and also a variable selected inside the panel and then using the “Make dynamic” button at the bottom of the panel. This could get very tedious with documents which have many variables! VariableImporter helps take care of this issue via the auto-binding feature. Illustrator art objects all can be made dynamic with the visibility variable, but only text frames can be made to have dynamic text, linked files can only have dynamic linked images, and graphs can only be made dynamic via graph data (not yet supported here).
To make dynamic text for this business card file, I will use simple point-text, but area and path text can also be used for this purpose.
To put a linked-file into the template, I simply made a graphic the exact size of my photos and placed it as a placeholder. The placed file has an “X” drawn through it when selected, so it’s apparent that this graphic is not embedded. To make sure you are placing a linked file, make sure the “Link” option is checked when using the File > Place dialog.
The auto-binding feature makes VariableImporter.jsx very useful when assigning variables to objects: it completely removes the need to use the Variables panel. All you would need to do is name the art the same names as used in the column names of the data file, and use a the “bindby- name” option when running the script. When setting a document up to be auto-bound, do not use the designation characters “@” or “#” in the name of those objects which are intended for visibility or links. For example, if the variable was called “#visibility” in the spreadsheet, the art named should just be “visibility”.
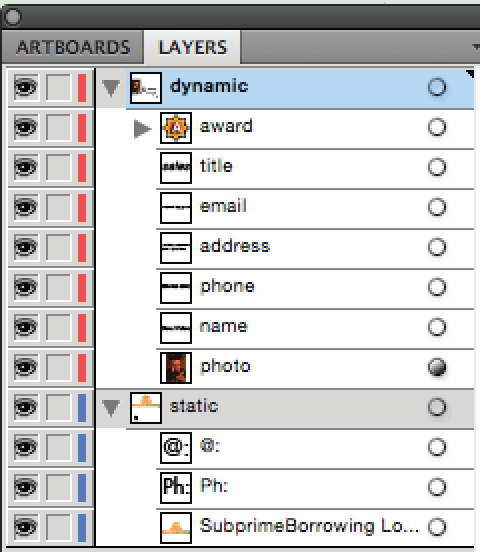
In this template, I used simple layer organization structure to specify the nature of art used. I have my static content which does not change in a layer labelled “static” and the dynamic content in a layer labelled “dynamic”. This way, the non-changing text such as “Ph:” does not get mixed up with the dynamic text.
Text names in the layers panel could be a little confusing because the initial ‘name’ in the layers panel appears to be the actual contents of the text frame. (If the text frame is empty, it simply says “”). To be sure that text frames are properly renamed for auto-binding, it’s important to remember to rename each one in the layers panel manually -- even if the contents of the text frame are the same as the variable name, they must be named by hand.
The linked-file image in my template is named “photo” as per column title, and that’s all it needs.
The “award” visibility variable is made to act on a group of art which will show up on the document when the associated variable is set to “true”. In the spreadsheet, those records which have an “X” in the #award column will have their award art visible, while others will have it hidden. Unlike a linked image, the award art object does not switch with other art, but always stays in the document in a hidden or visible state. Visibility items can be utilized in conjunction with Illustrator’s powerful appearance features to produce robust dynamic content which may not be possible in Photoshop or InDesign.
Running the script:
When the spreadsheet and Illustrator document are built, it is time to run the script. VariableImporter.jsx can be downloaded from the github link, with the easiest way being clicking on the “Raw” tab of the repository section for VariableImporter.jsx, and doing a “Save As” on the web page of raw text. Simply do a Save-As into your Illustrator application’s Scripts folder, or any folder of your choice. If you put the script into the application’s Scripts folder, you will see it in the File > Scripts menu after Illustrator is restarted. Otherwise, you can use File > Scripts > Other Script… menu item to browse for this script in your custom location.
When the script is ran, the first thing it will ask to do is open your data file. Choose your .csv file and the main dialog will appear next. The dialog has many features, and for this business card tutorial, I will quickly provide an overview of ones we’ll use for this document.
Work View
The checkbox at the top says “First row has column titles”. This means that you have a “header” in your data file and the script is assigning the variable names based on the column titles. This makes the process faster when all the names are known in advance and the spreadsheet has column titles. It is possible to import a spreadsheet of only data and to assign the variable names in this dialog by taking off this checkmark. For this document, it must be kept on.
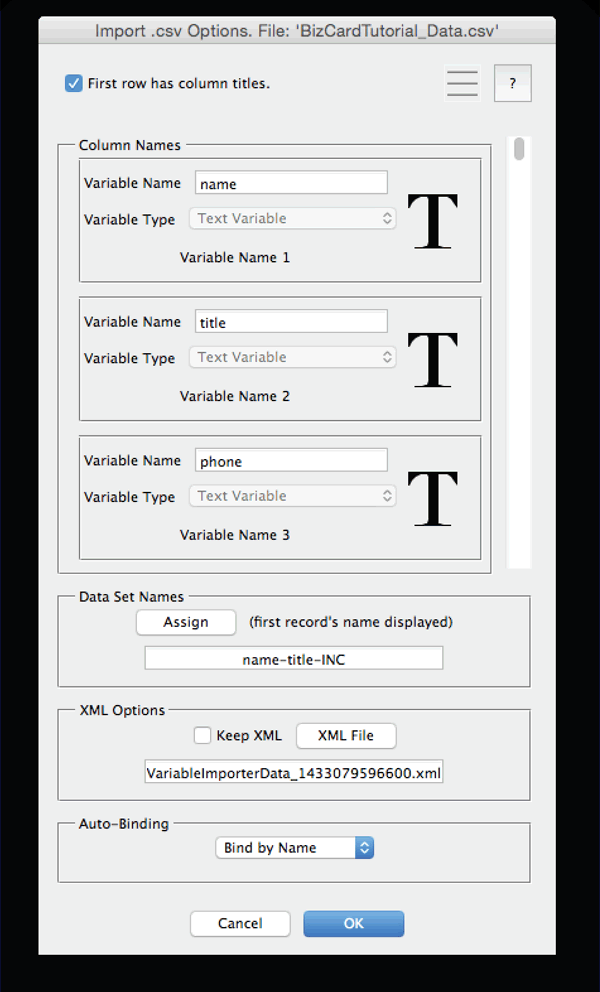  The “Column Names” box immediately below the top area displays a scrollable area of all the variables. Here, you can read the variable names to make sure that all the column titles were indeed interpreted correctly when importing the data, and assign or change variable type and name of columns when the “First row has column titles” checkbox is off. For new spreadsheets, it could be useful to scroll through this box to make sure variable names have come in as expected. One item to watch out for when first starting out, is to make sure that variables came in with the right variable type. In case you forgot to put the “@” character in front of the name you’d like to come in as a linked-file type variable, here you can quickly tell by the icon whether it is correct.
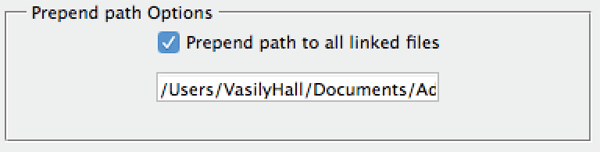
 In the case of linked-file variables, there is a special option which is revealed in the individual panel representing the variable: the “Prepend Path” option. Checking this box will bring up a dialog box in which you navigate to the folder you have all of the images in. When a folder is selected, it’s filepath is automatically prepended to the file name which is written in the linked-file variable column. “Hendricks.png” now becomes “/Users/User/Documents/Hendricks.png”, keeping the spreadsheet from extra bloat. However, it is still possible to enter individual platform-specific file paths inside the data cell to retrieve images for all unique locations.
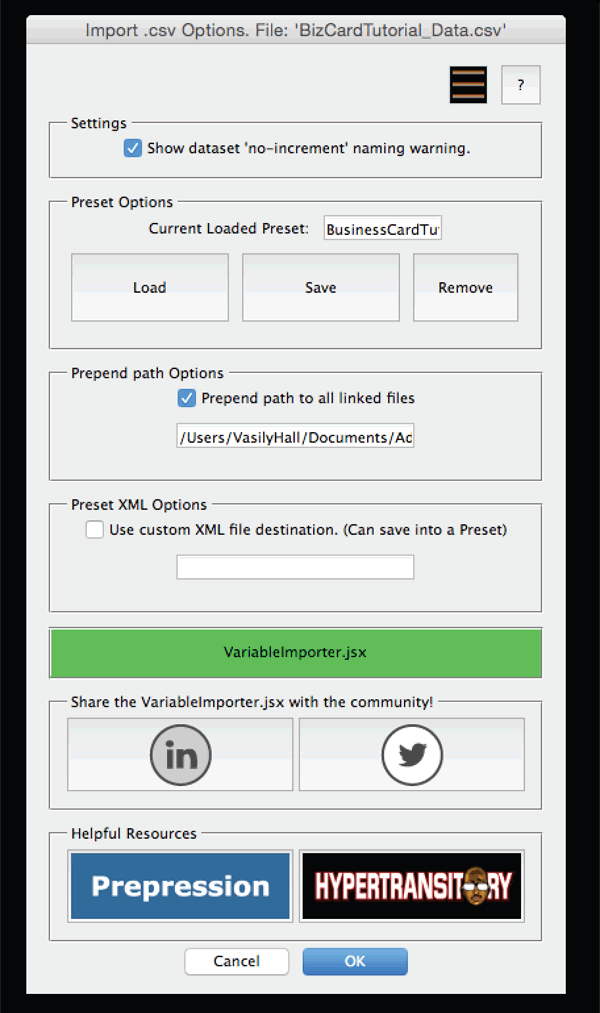
The “Data Set Names” box deals with naming of the data sets. The default value is much like the native Illustrator naming scheme for datasets. The way Illustrator does this by default is name each dataset with a generic name such as “Dataset 1”, “Dataset 2”, etc. VariableImporter.jsx names them as “Record 1”, “Record 2”, etc. With the dataset naming dialog, you can choose different options for naming the datasets, including the ability to use any variable’s content as part of the dataset name. For example, it’s possible to use the names of employees featured on the business cards as part of the dataset names. Using such custom names can be useful in the export phase of this workflow because dataset names can be used as file names of our dynamically-generated files. It is important that each dataset name is unique, so the default behavior of this script is to encourage at least one “Increment” field in the dataset name. If there is a non-unique element which is supposed to be unique, such as variable names or dataset names, the XML file automatically produced by this script would not be valid when attempting import.
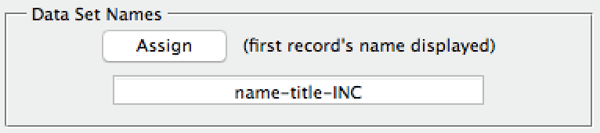 The “Keep XML” box allows you to keep an XML file which is generated by this script for later use. The magic of this script is simply translating .csv or .txt data into the Illustrator-XML file which is saved to a location on the user’s machine and then immediately imported to create the datasets within the Illustrator document. The XML file is then immediately discarded, unless options in the “Keep XML” box are set to do otherwise. The default setting for the name of the XML file is a generic name followed by a time-stamp (ex: VariableImportData_123478…). The button “XML” allows you to choose a custom saving destination for the XML file.
 The “Auto Binding” box in the main dialog contains a drop-down with options to help bind your variables to their intended art objects automatically as they are imported. For most purposes it is easiest to use the “Bind by Name” option, which will bind variables to art objects based on their “name” inside of the layers panel. It may be important to note that with auto-binding, you are subject to a “one-way-trip” when it comes to importing variables. For example, if there are multiple art objects which have the same name, a variable will duplicate itself to be assigned to multiple objects. This will allow you to use the same text content on multiple text-frames, and so on for the other variable types. However, if a variable library is output from such a document using the variables panel, manually, it will no longer be valid for re-importing back into Illustrator because of the fact that the variable names are now duplicated and no longer unique.
Controls View
In the right-top corner of the dialog window there is a generic instructions button with a [?] question-mark, and right next to it is the ‘menu’ button which reveals a secondary screen which is useful any time you plan on using this script to import similar data more than once, or if there are many image variables in your data.
First, there’s a “no-increment warning” checkbox at the top, it enables a warning pop-up alert that complains when the “Increment” field is removed from the dataset name. This can be disabled.
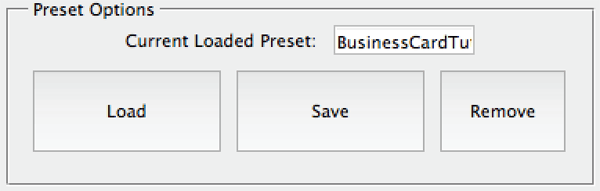
Preset Options area lets you save, load, and remove saved configuration states of this dialog box. The presets file that VariableImporter.jsx generates allows all of the checkboxes and file paths to be filled out, which may be useful if there are many similar jobs.
Prepend Path area will prepend a file path of a folder which contains images to the text in a cell in the column of your spreadsheet where names of image files are listed, to create the linked-file variable. With this checkbox on, every linked-file variable’s prepended file path will be changed.
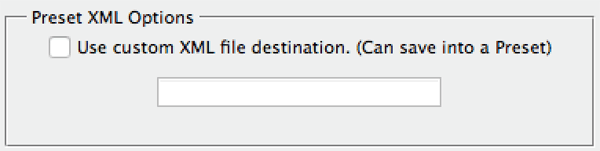
Preset XML Options does exactly what the “Keep XML” options box in the other view does, but this time it allows the XML file destination to be saved as part of the preset. There could be some technical or peripheral creative uses for this feature, such as using a web application or internal business software to utilize saved XML files for any purpose.
The script in action:
If the script was successful in execution, there will be an alert message saying how many variable names and records came in, and the variables panel should now show all of the newly-imported variables! If the auto-binding feature was used with the “By Name” option and appropriate art was named correctly in the layers panel, the variables as displayed in the variables panel should also be bound to the art. At this point, you can cycle through the datasets with the “back” and “forward” buttons of the variables panel. You can use a preview of the datasets to determine if some of the text will end up over-set so that you can judiciously reduce the font size or take other measures.
Batch-Processing
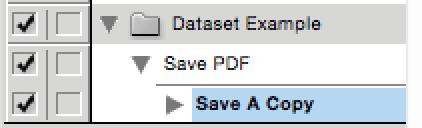
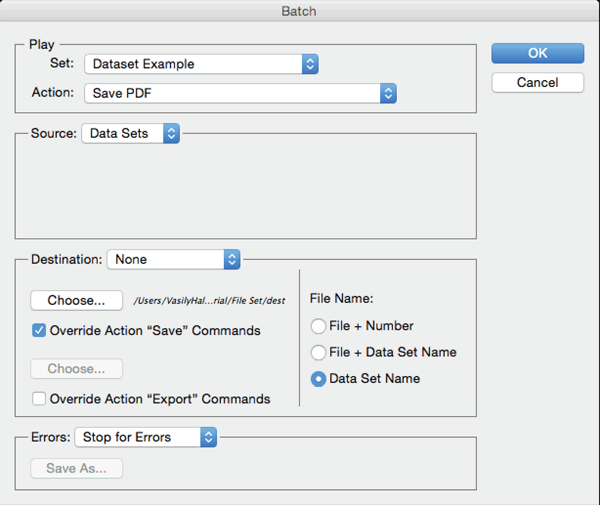
The last step would be to use an action in a batch-process to process each of the datasets. The most common example would be to output all of the generated business cards as .pdf files. To do so, use the Actions panel (Window > Actions) to record a PDF save. Use the File > Save Copy menu command to save the current file as a PDF copy in any destination folder, but do not change the default name of the file which is pre-populated into the Save dialog. It is recommended that you use “Save Copy” instead of “Save As” because Illustrator seems to leave off the file extension for some reason. Then, it’s time to process the datasets and turn them into PDFs. Use the fly-out menu of the Actions panel to access the “Batch…” command. In the following dialog box, choose Data Sets as your source and in Destination choose “None”, but also check the “Override Save Commands” checkbox to select an output folder of your choice. You may also choose how you want to name your files when they are saved, and you may see a good use for your workflow by assigning a custom dataset name and then choosing to name files with the dataset names. When you press OK, Illustrator will run through the datasets, saving each one as a PDF in your chosen folder.
  This is all there is to it, at least when it comes to the basics. Hopefully this tool will make lives easier for those users who need to use variable data in Adobe Illustrator.
Advanced Topics:
- Post Processing
The Illustrator method of outputting files using actions has a powerful advantage for cases where some postprocessing has to be done to the document after the dataset has been displayed. For example, when generating dynamic text documents, sometimes it’s important to have the text contained inside areas out of which it should not spill out from. Text area boxes can have too many characters inside them and they will cut off some of the word(s) while letting you know this by displaying a little red box with a + (plus) on the edge of the text frame. To correct this, it is possible to use a custom script embedded into an action via the “Insert Menu Item” command inside the fly-out menu of the actions panel.
- Appearances
Illustrator has its advantages when it comes to variable data, because of its powerful appearance functionality. Combined with visibility variables, art which has special appearances placed on it can be used to produce a rich variety of graphics combinations. Some areas where appearances can drive a document’s layout: Textwrap, pathfinder effects, Illustrator’s vector-on-raster effects such as Outline Object or Convert to Shape, Transform effects, and any other combination of effects in the appearance panel anyone may discover.
|