|
Once I saw a sketch that one artist draw in the pencil hatching style. Being impressed by the apparent casualness of path and zigzag strokes, I immediately wanted to try to imitate this technique in Adobe Illustrator. But it turned out that the tablet’s pen with the selected Pencil Tool forms too many unnecessary anchor points while you draw, which are quite difficult to remove.
And then I remembered a good old Arc Tool - a tool that I almost never used. Now I understand that it was in vain…
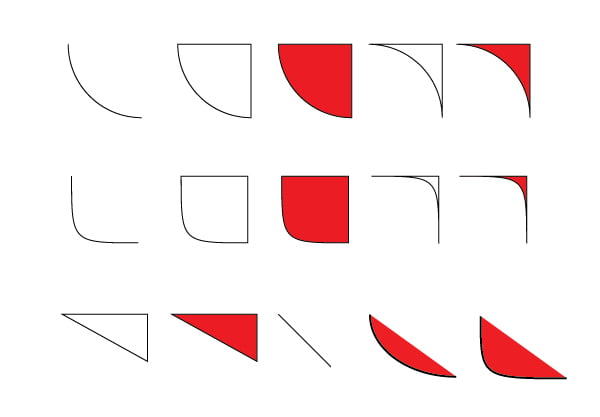
Each segment drawn with it can be individually bent and this segment has only two anchor points. Isn’t it a perfect tool for path hatching?
And if during the hatch you’re not limited to the drawing of arcs, apart from the regular arcs (¼ circle), you can create other shapes on the basis of the Bezier curves (hyperbola curves, parabolas, ellipses, as well as straight line segments and right-angled triangles).
Moreover, with this tool the user can create segments based on the curves mentioned above, which can optionally be closed by cathetus hypotenuses of which are chords of these segments.
Besides single figures, the Arc Tool allows you to create whole interactive bundles which change dynamically when you drag the tool of grouped curves, beginnings of which converge in one point. And so on…
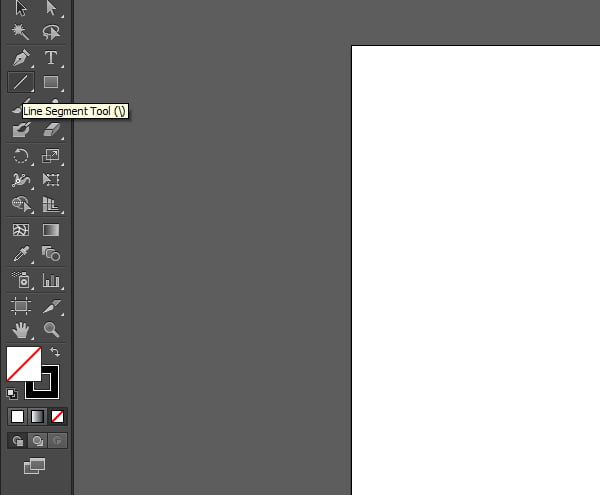
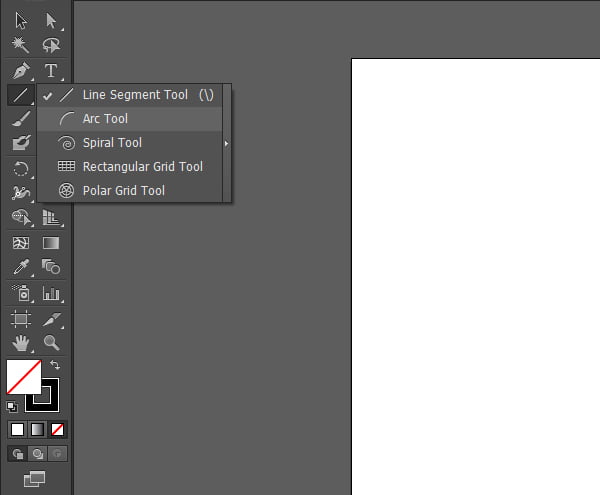
A button with the Arc Tool at the Arc Tool panel is located in the same group with the Line Segment Tool. The default shortcut key is not assigned.
To select the Arc Tool, click on the Line Segment Tool and while holding down the pointer, and after a pop-up window with a group of tools shows, drag the pointer to the Arc Tool.
Drawing of simple arcs and objects based on them
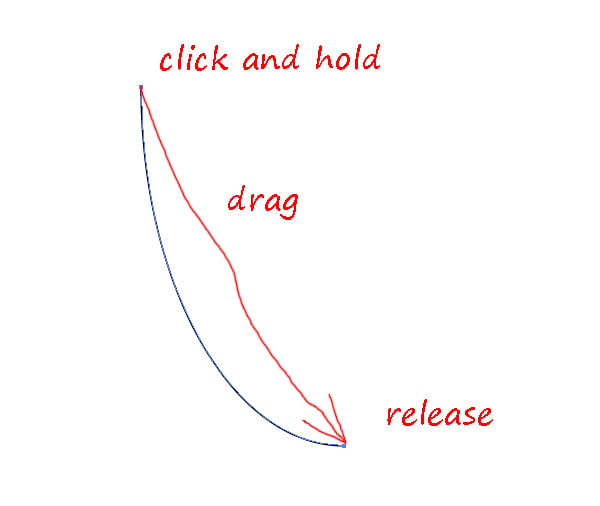
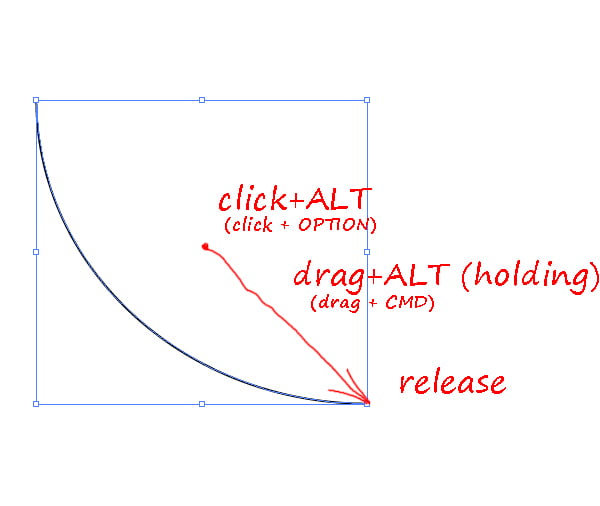
In order to draw an arc with default settings, click anywhere in the workspace with the left button and while holding the mouse button, drag the cursor to the desired arc and stretching to the desired point.
If while drawing your arc you are holding Opt/ALT, then the arc (its bounding box) will be set up from the point where you made the initial click of the pointer.
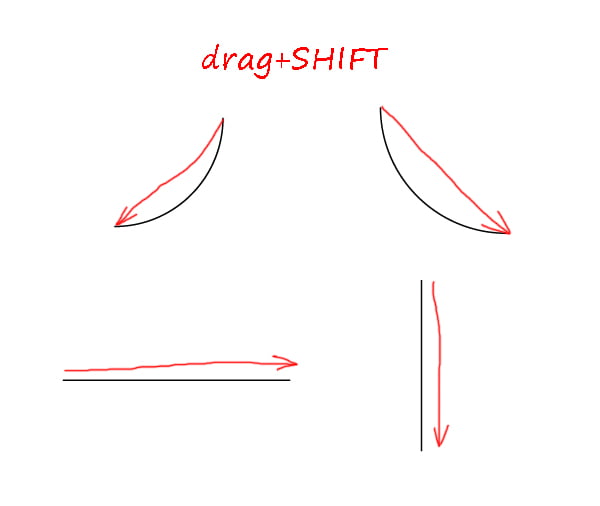
If while drawing your arc and holding down SHIFT, then depending on the found position will correct a quarter of a circle or a straight horizontal (vertical) segment. Endpoints are disposed at multiples of 45 °.
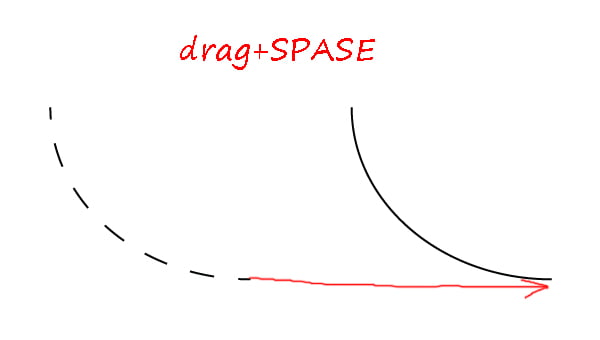
If you’re pressing SPACE, it allows you moving the arc with the pointer when drawing.
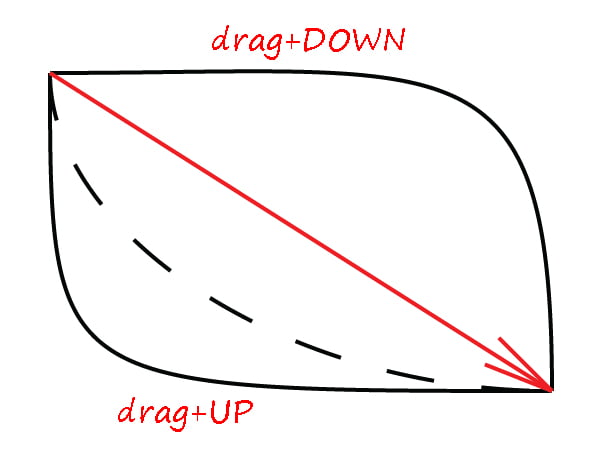
Pressing the arrows ↑ or ↓ when drawing provides an increase or decrease of concave (convex) of the arc. The curvature of the arc might approach the curvature of the segment of a hyperbola or be zero, as a direct line.
This curvature settings are saved for drawing of further arcs. (To reset to the default settings, set Slope to refer to the value of 50. See below).
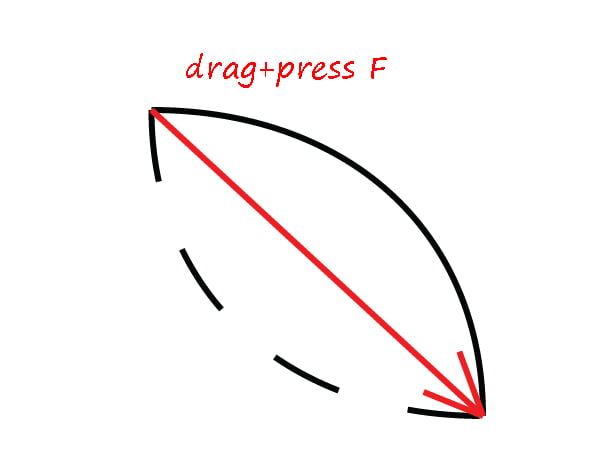
The F key, pressed once while drawing an arc, turns the arc over, and keeps the starting drawing point.
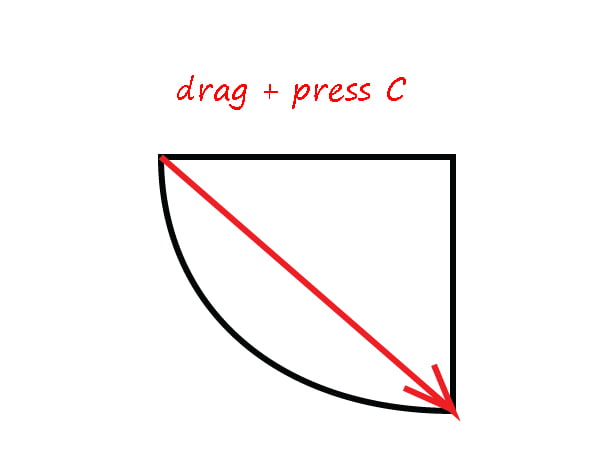
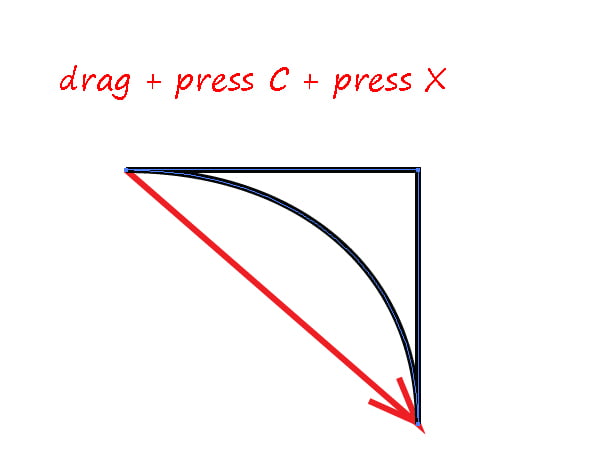
The C key, pressed at the same time while drawing an arc, closes the object with two straight cathetus.
The X key, when pressed one time after closing of the path, changes the arc orientation of the concave to the opposite.
Drawing with the Arc Tool in "the brush mode"
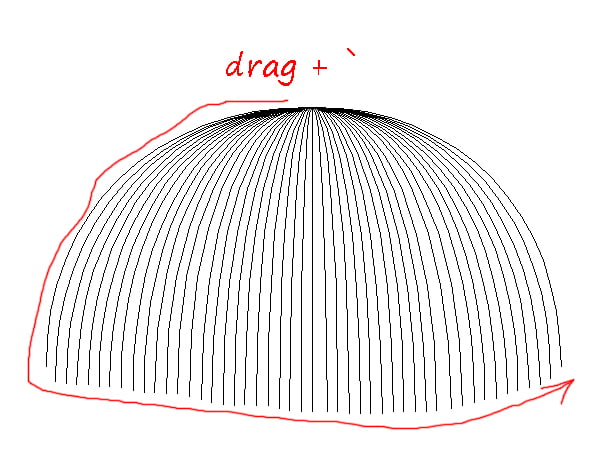
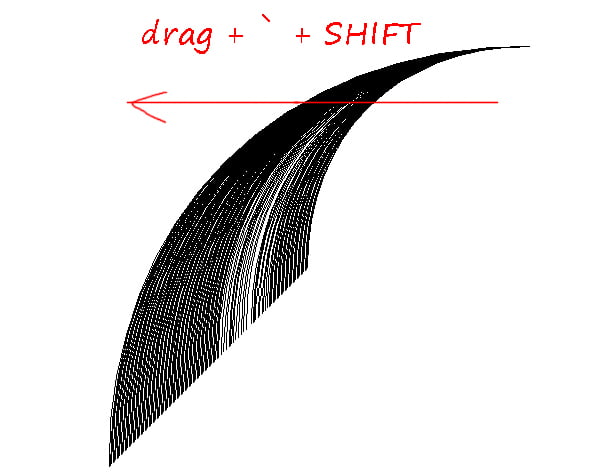
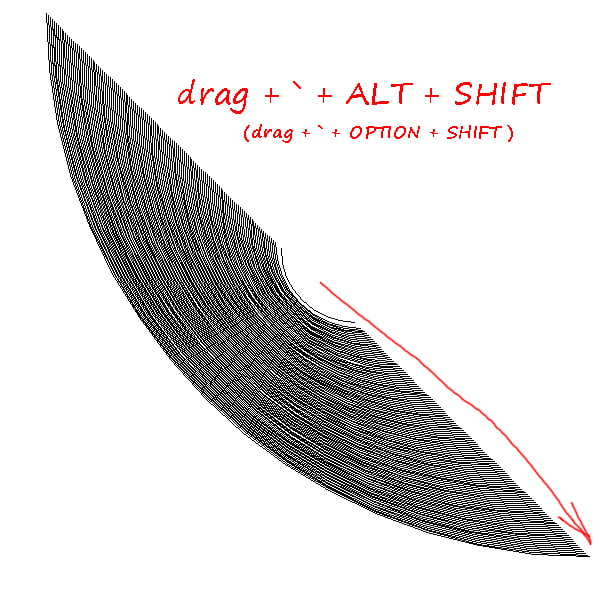
By pressing the modifier ` ‘backtick’ (located on the same key as the sign ~" tilde "), the Arc Tool turns into a kind of "a brush" that "draws arcs".
The ' key, held at the time of drawing provides a sheaf of curves, the beginnings of which converge at one point, and the ends are located on the path of pointer movement. Density factor of curve generation in the bundles in a certain range is adjusted by image zoom.
If while drawing SHIFT is pressed, the end points of the curves will be located at a 45° angle.
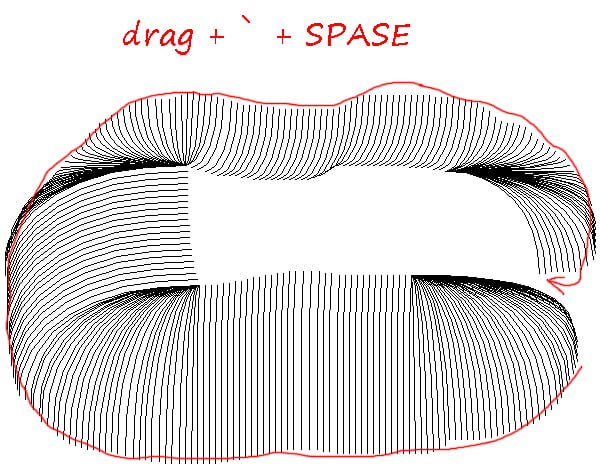
If pressing SPACE after pressing the ` key at the time of drawing, a bundle of parallel curves are created, and after releasing space, the beginnings of the curves are bound to a new point of mounting area. And so on …
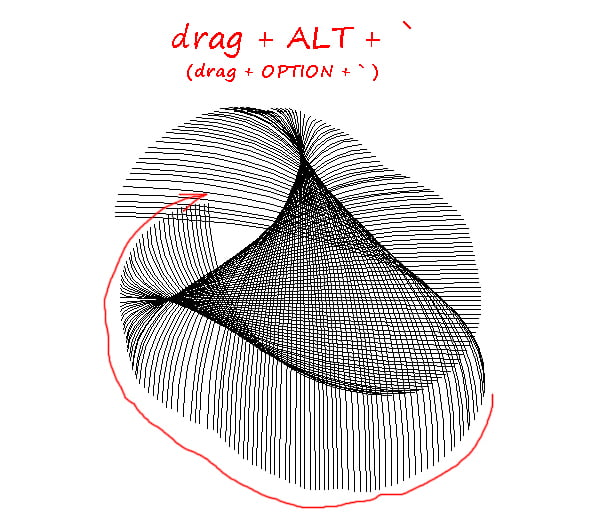
Pressing Opt/Alt before pressing the ` key at the time of drawing creates a sheaf of radiating curves, the centers of bounding boxes are located at the point of initial click of the pointer.
Pressing SPASE at the time of the drawing moves the point of overall centers coincidence of containers together with the cursor.
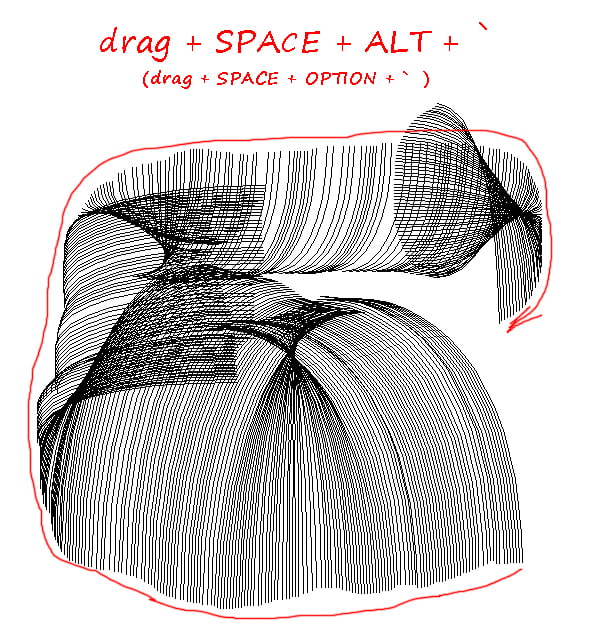
Pressing Shift while drawing and while holding down the ` key and Opt/Alt creates parallel curves, start and end points of which are located on an imaginary line located at a 45° angle.
Drawing of arcs and figures based on arcs with the given parameters with the Arc Tool
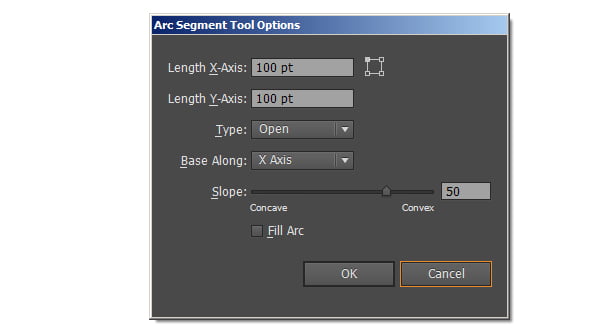
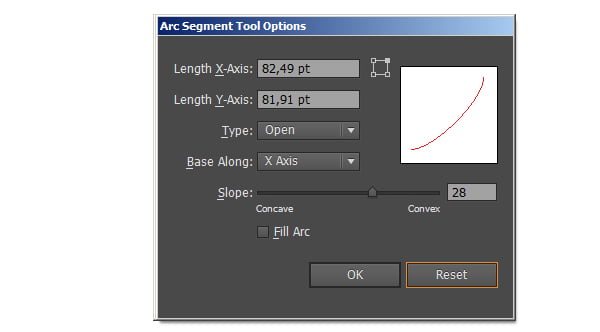
To create an arc with set parameters, one should turn on the Arc Tool and make a click at the starting point. A dialog box of Arc Segment Tool Options will appear. In this dialog box, the default settings are already chosen for the previous arc.
If the Arc Tool is selected and ENTER is pressed, then in addition to displaying the settings of the previous arc, there will be also be a little window with its image.
In fields Length X-Axis (the length along axis X) and Y-Axis Length (the length along axis Y) the width and height of the arc is set.
In the drop-down list Type two options are displayed Opened and Closed.
In the drop-down list Base Along (the direction of the arc base) there are two options: X Axis (along axis X) and Y Axis (along axis Y).
Parameter Slope: (steepness) with a slider and a window to enter the settings for using a concavity (Concave) or convexity (Convex) of the arc, as well as how steep or sloping the concave or convex is. Value 0 is a straight line. A value 50 is a curved segment of 1/4 of the circle;
A tick in the check-box Fill Arc assigns the color set fill of the shape.
A rectangle with markers, which is located to the right of the field Length X-Axis: (length along the axis X) determines the starting point of drawing of an arc segment in size container.
To reset the arc’s settings to default settings when the dialog box Arc Segment Tool Options is still opened, you should hold down the modifier Alt. (In this case, the Cancel button in the dialog box will become a reset button). Then click on the Reset indicator.
As a preview a Trendy Rainbow Creative Icon image from Shutterstock was used.
|