|
Illustrator provides us with a wide range of drawing opportunities, but the more complex the applied effects are, the greater the risk of having a problem when printing is. To avoid this, you need to follow a few simple rules for creating and saving vector files that you are planning to print.
In this Illustrator tutorial we will not go into the smallest details such as color profiles and printing using five colors. Our task is simply to learn how to decide in what way to save the image, depending on the drawing technique.
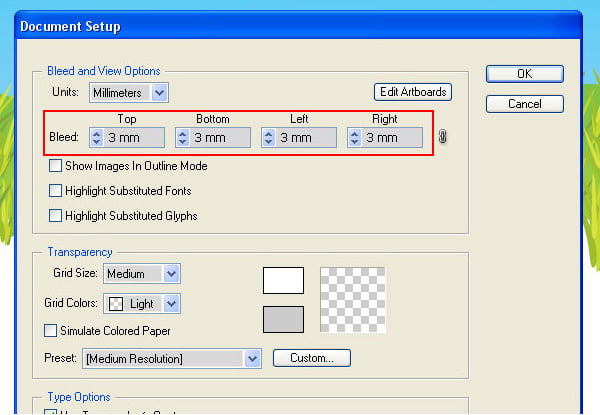
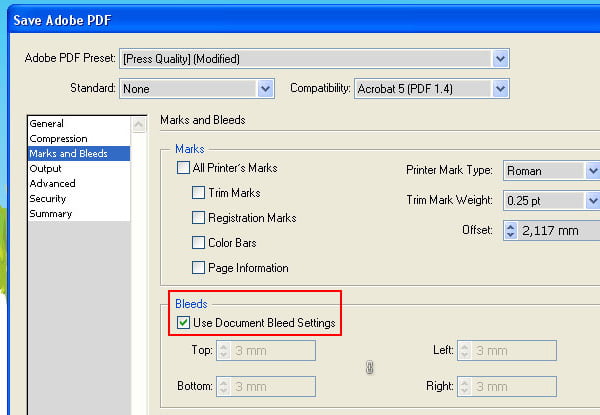
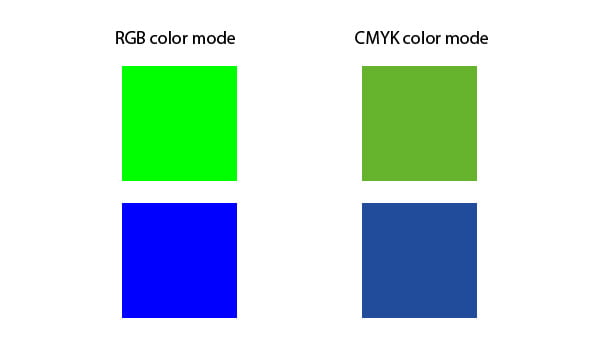
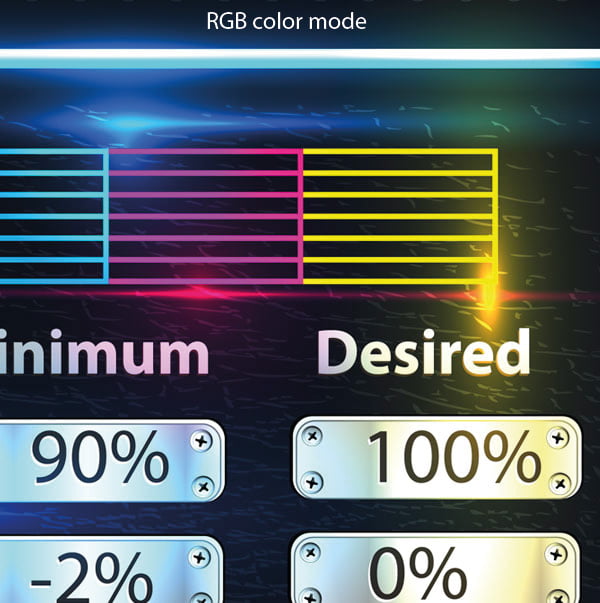
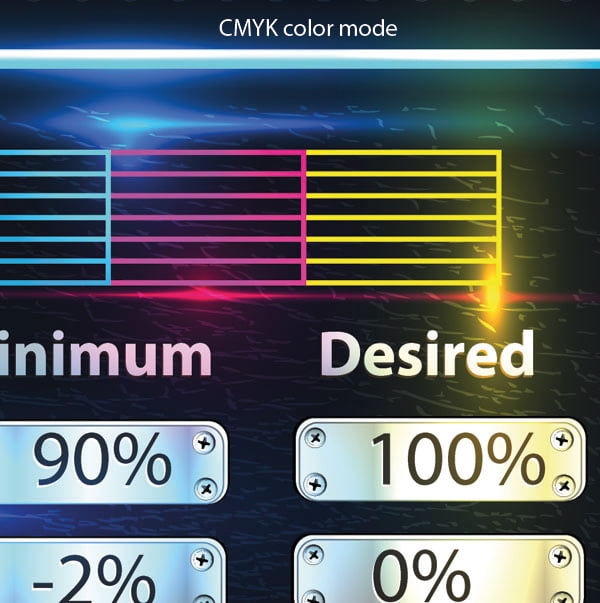
Working with the stroke and black color in IllustratorWhen you create even a simple vector image, you are required to take into account some of the peculiarities right at the stage of creation of the new vector file. If you choose not to convert the strokes to objects, in order not to increase the number of nodes and, therefore, the time of file processing, do not forget to tick Scale Strokes & Effects in the fly-out menu in the Transform panel, it will allow to scale the stroke together with the object. This rule must be applied to brushes too. 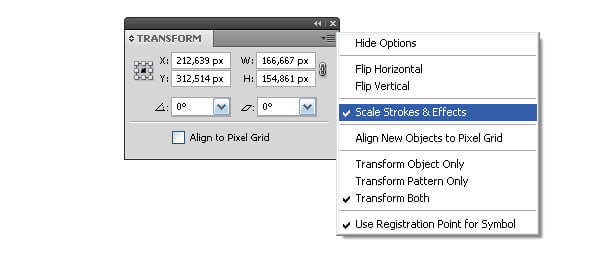 If there are black vector outlines in the illustration, they should be 100% black, without mixtures of other colors. The strokes thickness should not be less than 0.1 mm, and it is better to set 0.15 mm and above for them. A large area of the image covered with black color, on the contrary, must contain colors other than black, otherwise the background will be dim. The total density of the composite black depends on the profile of the specific printing, and when executer is unknown, it is accepted to stay within the amount of 300%. Creating bleeds for proper cutting of the illustration for the replication.If the work is created for replication and contains background coming to the edges of the layout table, it is desirable to slightly extend the background beyond the planned borders: usually 3 mm along the perimeter. Otherwise illustration may simply become not properly cut. Illustrator allows you to create bleeds and preserve the right size of the illustration, by setting the appropriate settings in the Document Setup and Save Adobe PDF dialog windows. How to work with blue and green colors when preparing for printingTypically, an illustrator with little experience in the printing industry has problems with green and blue fills. These colors and their shades are the most appeal-loosing when printing in CMYK color mode. Below you can see an example of what happens to the blue and green colors. What can be done? You just need to be able to deceive the human eye. The fact that the same color looks different on the dark, white and non-contrast backgrounds is known to every artist from the school bench. Carefully think over the color scheme. In addition, Illustrator has convenient settings of the gradients and their skillful use will force a person to "make up" graphic information and see your image brighter and more attractive than what print in four colors shows. When the chosen graphical style allows you to apply gradients - use it. How to prepare complex images that contain transparent objects and raster effects for printing.When technically a simple image can be saved in EPS or PDF formats and easily sent in print, the usage of transparency, combined with gradients, Art Brushes, patterns, Opacity Masks and raster effects requires more careful preparation. When printing house is known in advance, all the details can be obtained from the tech. Theoretically, they will just accept your finished illustration saved in EPS format from version 9 and up or PDF 1.4. Saving files in the mentioned formats, allows you to open them in Illustrator in the "original" form and easily edit as necessary. Modern equipment and software are loyal to transparency.
But when the further fate of the file cannot be traced, many prefer to play it safe. Good old barbaric way to save this illustration in EPS8. Thus, even elliptical radial gradients will be saved as Clipping Masks, into which raster is placed. If you do not mind this phenomenon, use it safely, but your image can no longer become edited. But make sure you keep the original vector file.
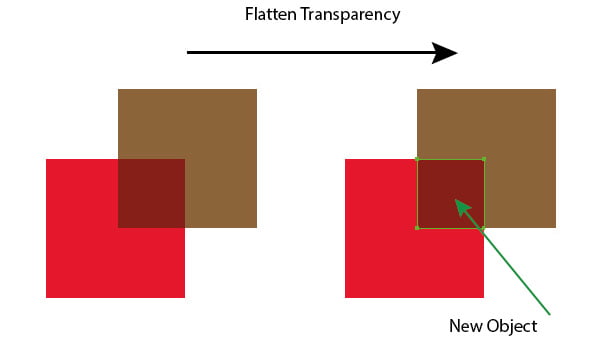
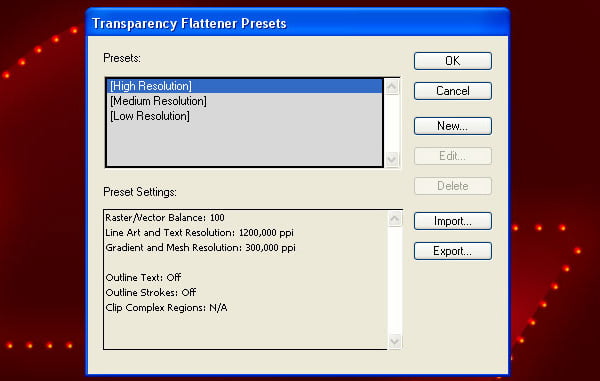
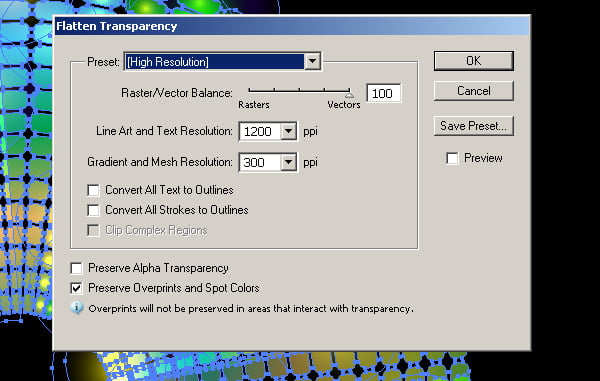
Another, gentler way for the vector is the Flatten Transparency (Object > Flatten Transparency …). In this case, the overlapping areas will be transformed into individual objects. In other words, instead of two overlapping objects with transparencies you get three opaque ones. Object, resulting from the intersection area, will be colored into the corresponding color. When preparing a file, it is desirable to turn on the Overprint Preview feature (View > Overprint Preview). Flatten Transparency can be applied to the objects with transparencies, as well as to the objects on which they are overlapped. When using the Art Brushes, textures, text, patterns below the clear areas, first run Expand command to avoid possible distortions. Note, this operation increases the number of nodes, which affects the size of the file, though not for the better. Next, do the Flatten Transparency command. Raster \ Vector Balance slider should be at the right utmost position.
But if the file contains objects with gradients that are one on top of another with the Blending modes applied to them, the location of their intersection will be rasterized. Flatten Transparency function will not work here. What else is rasterized? Using of Gaussian blur and Radial blur, Drop Shadow, etc. entails rasterizing of some parts of the objects. Flatten Transparency recommended settings are shown in the pictures below Do not ban yourself from using transparency, you just need to be familiar with all the tools of Adobe Illustrator and not be afraid to experiment: sometimes to create shadows it is enough to apply the Blend Tool. Vector files rasterizingIn general, it should be noted that vector format is not the goal, in the long run, any image can still be rasterized for print. Therefore vector format should be preserved as much as possible. However, there are times when the size of the printed product is finally known, and there is no scaling is required, and vector image represents a huge number of nodes and textures or blurred abstract background. Obviously, in such cases, sticking the vector does not make sense, it is safer to keep a quality raster.
Special case: glowing abstract backgrounds, which are more convenient to be created in RGB, during the simple transfer to CMYK lose half of color information, transparencies, and become worthless, while rasterizing can save the image, though with the losses, but not as serious. You can export the work from Illustrator into TIFF format, specifying the desired color mode and resolution. And you can rasterize by opening the file in Photoshop, and this raster editor works fine with PDF, EPS and Ai formats. There is one peculiarity to be considered: when rasterizing, to prevent loss of color information, keep the same color model and the same color profile, in which the vector file was saved (Photoshop itself offers them at the opening). And only then the file is placed into the right color space.
This method is handy for large format printing when TIFF format is required, and Illustrator does not allow you to create and export images of the required size. Creating artworks for exhibition stands or outdoor advertising, interior decoration, we can safely work in a vector on a scale which it is convenient for us. When you open the file in Photoshop simply specify the desired resolution and size in metric units.
For the offset printing, you need at least 300 ppi (this is a default setting needed for laser printing), while wide format does not need large ppi. Modern plotters will print a file for outdoor advertising, saved from 24 ppi, in a good quality. Interior print does not need a value set above 150ppi (usually a 96-120ppi) — higher value does not add quality, but it will increase the time of the file-processing.
I got a short article, but generally it is the minimum, which is desirable to know, when doing work for printing. Good luck to all readers!
Follow us if you want to be the first to know about the latest Adobe Illustrator tutorials, Interviews and articles. Vectorboom team works for you!
|